Map Viewer Taskbar
The taskbar runs across the top of the GIS Map Viewer and holds all 15 core map tools: address search, zoom and pan, GPS locate, identify, select parcels, drawing tools, measurement, and printing. Use this page as an icon-by-icon reference: each entry below shows the button's exact tooltip text as it appears when you hover it.

How do I search and navigate with the taskbar?
The left-most icons and the address box find locations and move the map. Tooltip text is quoted exactly as it appears in the product.

- Address search box (top-right of the taskbar): placeholder text reads "Enter address including city and/or zipcode...". Type a street address and click Search. This box is address-only. It does not accept a parcel ID (PIN) as a fallback, so use Parcel Search to look up a property by PIN instead.
- Zoom In. Click a spot on the map to zoom to that point, or click-drag to draw a rectangle and zoom to that area.
- Pan (tooltip: "Pan map - click-drag on map to pan in any direction").
- Locate Me (GPS bullseye, tooltip: "Zooms map to your location."). Useful on mobile devices with location services enabled.
- Previous Extent (tooltip: "Previous map extent in history"). Steps the map back to where you were looking before.
- Next Extent (tooltip: "Next map extent in history"). Steps forward again after using Previous Extent.
You should now see the map centered on your searched address, or on the extent you navigated to.
What do the identify icons do?

- Identify Map Feature ("i-tool", tooltip: "Identify map feature - click on the map to see details about a map layer."). Click anywhere on the map to see details from whichever layers are currently checked on in the Layers panel.
- Identify Parcel (tooltip: "Identify Parcel - click on the map to see details about a parcel in left panel."). Click a parcel to open its details in the left panel without leaving the map.
You should now see either a layer-details popup or the clicked parcel's information open in the left panel.
How do I select and clear parcels on the map?

- Select Parcels (tooltip: "Select Parcels"). Opens a compact toolbar with four selection methods:
- Select by Point: "Select parcels by clicking on the map."
- Select by Polygon: "Select parcels by clicking on the map to create a selection area polygon, double-click to end".
- Select by Radius: "Select parcels by clicking on the map to create a selection area by radius, double-click to end".
- Select by Line: "Select parcels by drawing a line. Single click to start and create line vertices. Double-click to end".
- Click Select Tasks to open a menu of actions for your current selection. The menu contains two fixed items (Copy Boundary to Drawing and Set Selection Layer) plus one Add to entry per custom table your account has access to, for example Add to Custom Boundaries (see Custom Boundaries for the full flow).
- Click Done to close the Select Parcels toolbar and return to Pan mode.
- Clear Selected Parcels Graphics (back on the main taskbar, tooltip: "Clear Selected Parcels Graphics"). Removes the current selection from the map; it does not delete anything from the underlying parcel data.

How do I draw and measure on the map?

- Drawing Tools (tooltip: "Drawing Tools"). Opens the full drawing toolset for points, logos, lines, and polygons saved to named projects. See Drawing Tools for the complete walkthrough.
- Measure Area (tooltip: "Measure area - click on the map to define an area to measure."). Click points on the map to draw a polygon and see its area.
- Measure Distance (tooltip: "Measure distance - click on map to define a line to measure distance"). Click points to draw a path and see its total length.
You should now see the drawing toolset open, or a live area/distance readout following your clicks on the map.
How do I print or export the map?

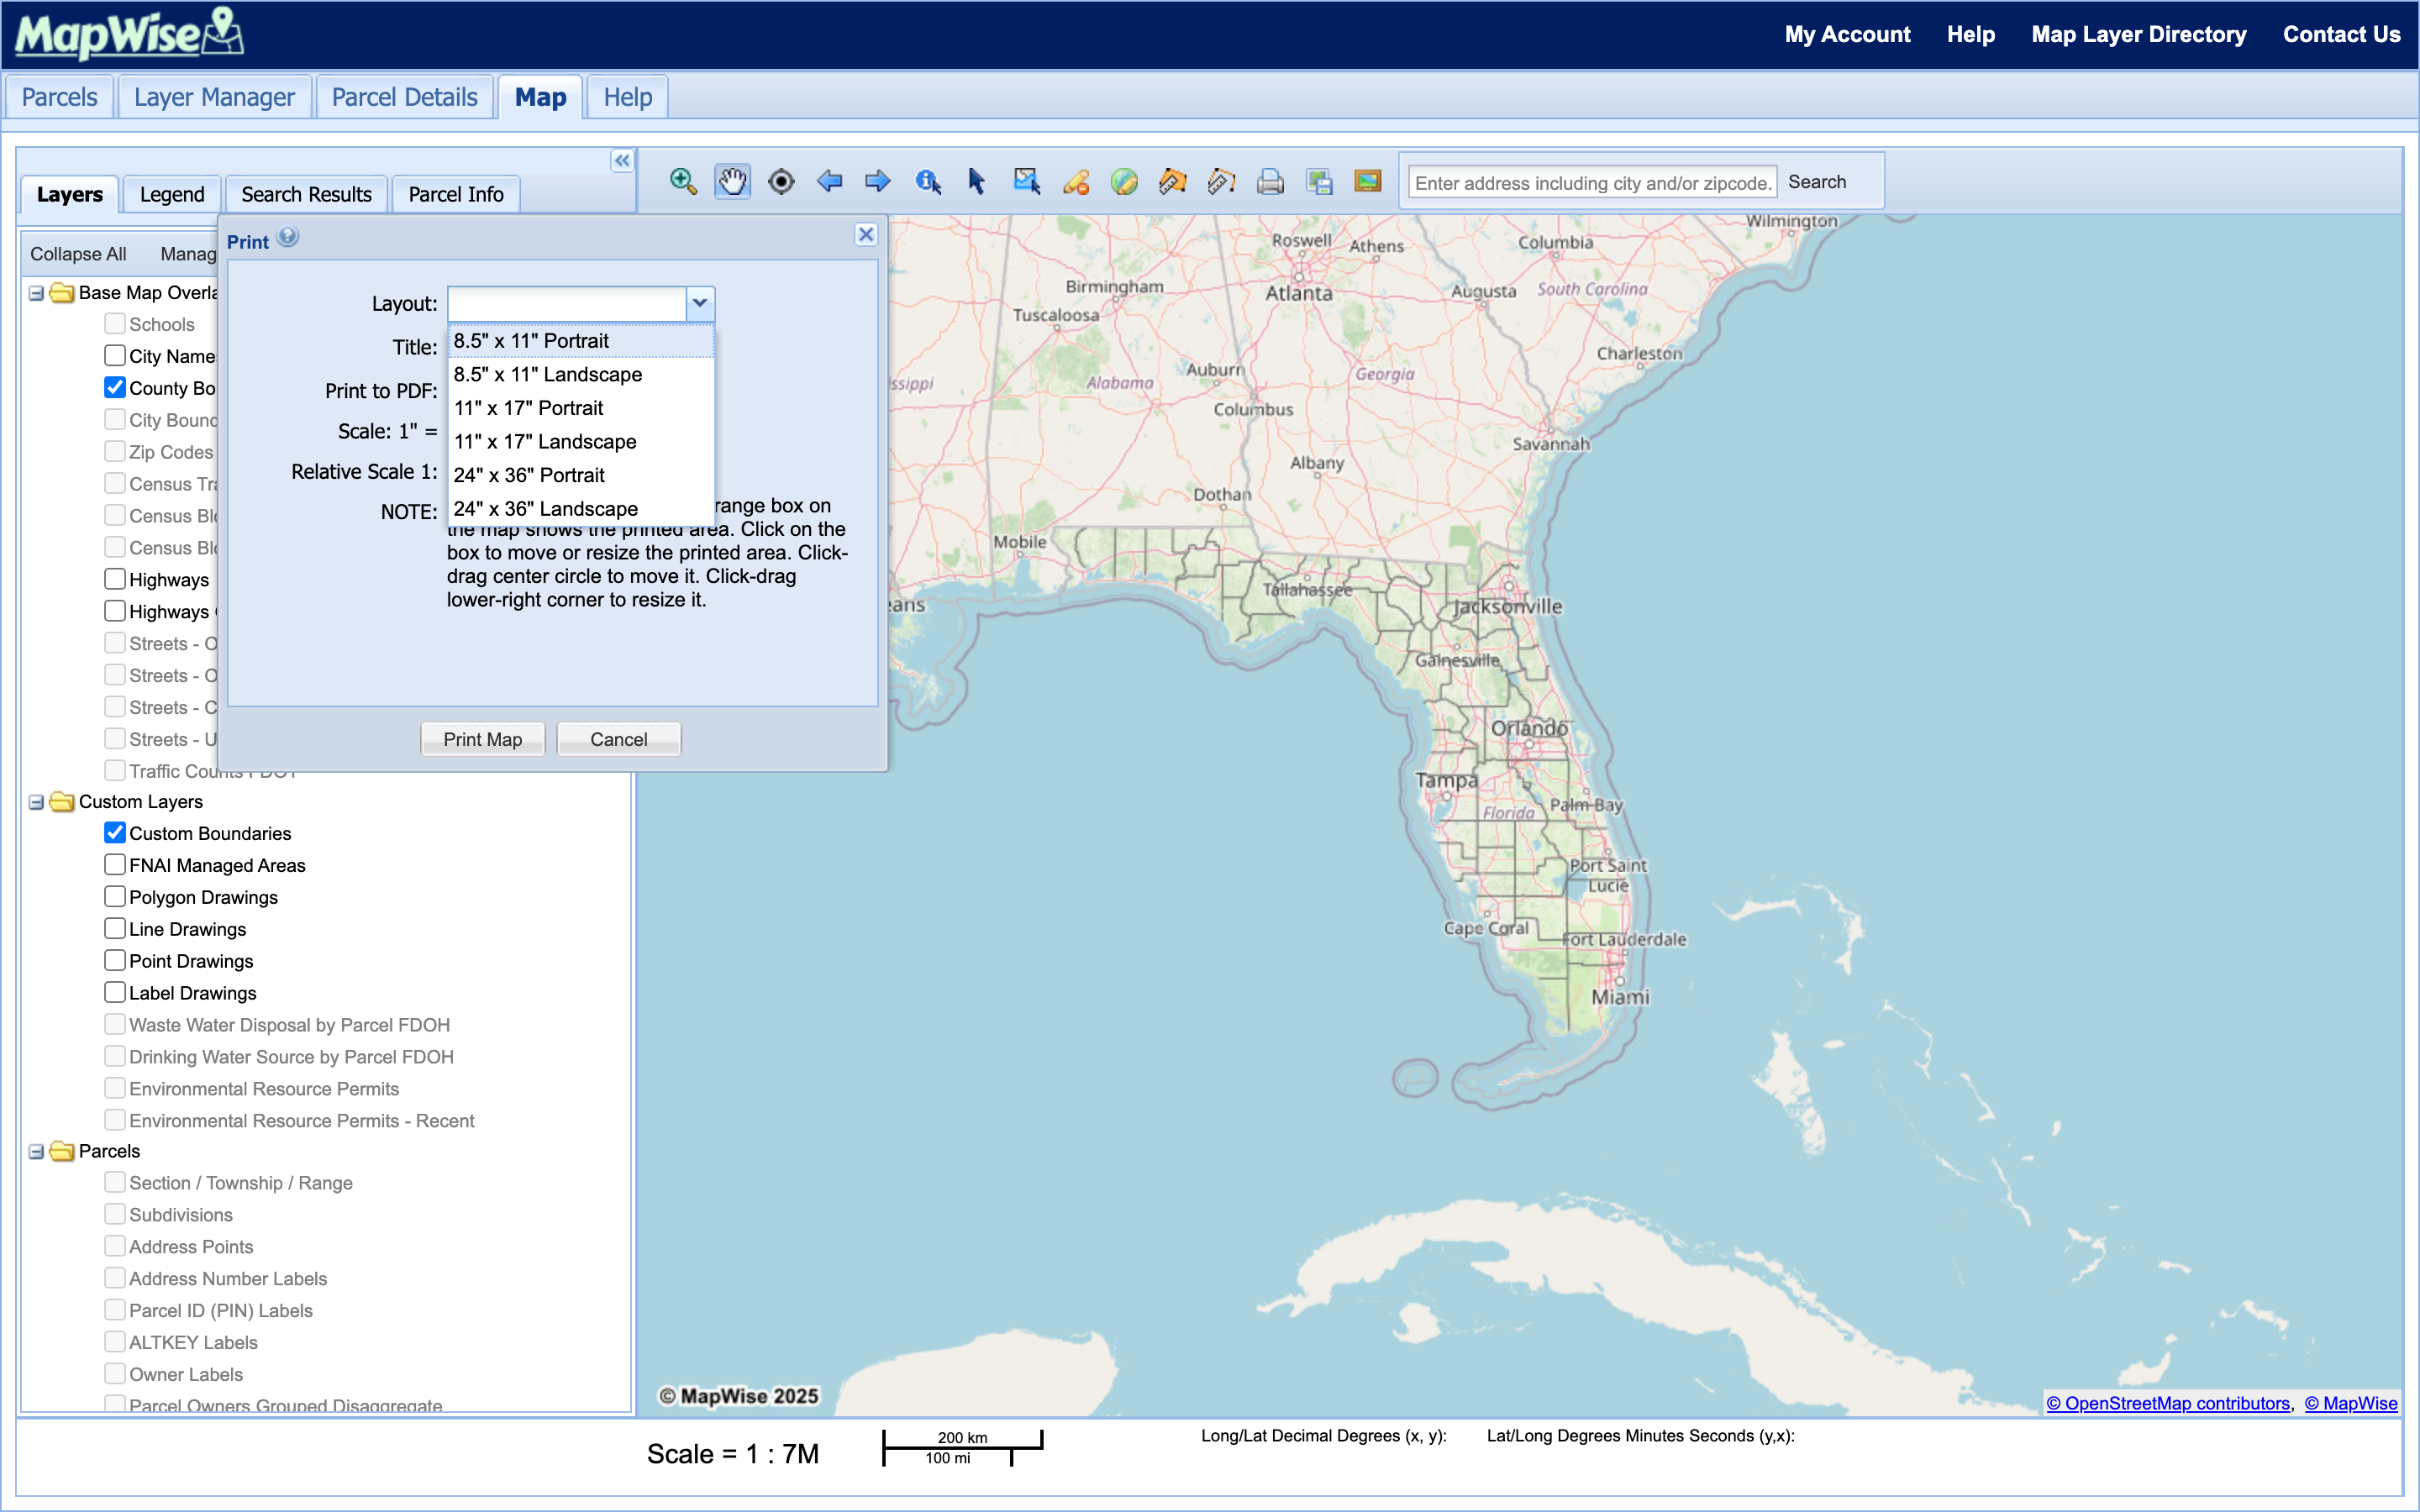
- Print Map (tooltip: "Print Map"). Click it to open the print window, then:
- The window offers a Layout dropdown with six page sizes: 8.5" x 11" Portrait, 8.5" x 11" Landscape, 11" x 17" Portrait, 11" x 17" Landscape, 24" x 36" Portrait, and 24" x 36" Landscape, plus a Title field and a Print to PDF checkbox.
- Pick a layout. An orange box appears on the map showing the printed area. Click-drag its center circle to move it, or its lower-right corner to resize it.
- Click Print Map to generate the file, or Cancel to close the window without printing. The printed map opens as a PDF or your browser's print dialog, depending on your Print to PDF setting.
- Generate Image to Download (tooltip: "Generate Image to Download"). Opens a window to export the current map view as an image file.
- Snapshot (tooltip: "Generate snapshot image of current map"). Captures a one-click image of the current map view, with no dialog to configure.
How do I run my first search from the taskbar?
- Type a street address, including city and/or zip code, into the search box at the top-right of the taskbar, then click Search. The map zooms to that location.
- Click Select Parcels, then Select by Point, and click the parcel you're interested in on the map.
- Click Identify Parcel and click the same parcel again to open its details in the left panel.
You should now see a highlighted parcel on the map with its details open in the left panel. For a full search by owner, PIN, land use, or other criteria, see Parcel Search.
Ready to Get Started?
Select a plan, schedule a personalized demo, or contact our support team.